Main Content
A Lifetime of Expert Tips and Shortcuts are Shared in Two Days at Rutgers’ Concrete Pavers Course
Written by Rebecca Rathmill; originally published November 5, 2013
So you just installed a paver patio. Stand back and admire your work. It probably looks pretty decent right now.
But wait a few months. Or a year. Let one good winter pass. Now how does it look?
What Can Go Wrong When You Don’t Know What You’re Doing
“A lot of pavers look good when they first go in,” said Alex Burke, instructor in Rutgers’ Concrete Pavers class. But when an installer doesn’t really know what he is doing, the ill effects will show within a year.

“After you’ve gone through the winter and had time for settling, that’s when you start to see problems,” explained Burke. “It might be frost heaving, settling, or problems caused by difficult site conditions, like clay soil.”
Frost heaving – a situation in which moisture in the ground below the pavers freezes, expands, and causes the soil around it to bulge – results in paver bricks pushing up out of place. It’s not only an eye-sore, but a potential tripping hazard. Avoiding this and other problems starts with the base.
“The area where you need to put in the most effort,” said Burke, “is the base prep.”
Alex Burke should know. When it comes to installing concrete pavers – from walkways to patios to driveways to edging –he’s an expert. With almost two decades of experience as the owner of Burke Environmental, Inc., a landscape design, construction, and nursery company, Burke has overseen the installation of nearly 500 paver projects.
It’s no surprise then, that when participants are asked what the most useful aspect of the program is, the most common response is simple: Alex Burke.
As one attendee, Dave DePue, put it: “Mr. Burke’s years of paver knowledge were presented greatly within the class. The whole class contained a lot of useful information. I recommend taking this class to anyone!”
Burke’s Top Tip for Success
Understanding proper base prep – from excavation depth to selecting and installing the proper materials – is Burke’s number one tip for concrete paver installation success, something he covers thoroughly in the class.
“If you do base prep properly, you’ll never get settling,” Burke said.
One company owner who attended echoed this lesson, saying that he now knows to make “sure your base prep is done properly,” because you won’t have “problems in the future with call backs.”
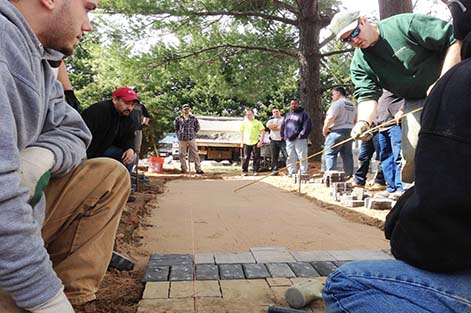
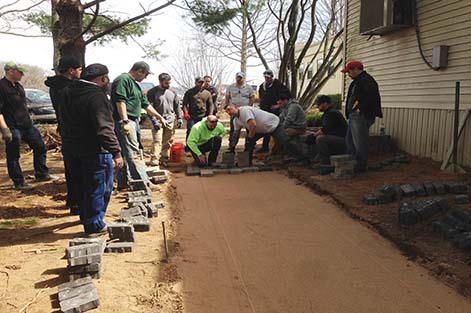
But Burke not only covers base prep; he goes over paver installation step by step. “I go from start to finish; from designing to estimating (how to determine a price for the job) to installation,” in the class.
Past attendees of the Concrete Pavers class have included landscape professionals who want to learn how to install concrete pavers and expand their menu of services (instead of sub-contracting the service out); landscape designers looking to improve their paver design skills; and homeowners who want to learn more about the process, understand how paver patio costs are estimated, or find out what they should look for when selecting a brick paver contractor.
4 Tips for Successful Concrete Paver Installation from Alex Burke
- Always do proper base prep.
- Know the different types of paver edging and their installation techniques.
- Understand how to deal with varying site conditions (soil, terrain, drainage).
- Learn to estimate properly so you don’t lose money.
How Much Does a Paver Patio Cost?
Estimating paver installation costs and determining a job’s price – real-world, practical business skills – are two of the most valued takeaways from the class.
In fact, an Engineer and Landscape Designer whose goal in attending was to “learn the proper installation techniques” ended up leaving with much more: an appreciation for “estimating – very comprehensive!”
Attendees especially appreciated learning about paver cost estimating from someone like Burke, who has been there before.
“I lost money on the first few jobs I did,” Burke admitted. “I ended up paying the homeowners to put in paver patios.”
His goal is to teach students how to avoid the mistakes he made. One way he does this is by sharing a portfolio of his paver jobs and telling students what he charged for each one. He explains how he determined the price – from estimating material costs and labor to adding in his overhead costs and mark-ups.
Calculating Paver Installation Costs: Know Your Own Numbers

One question class participants always ask Burke is what they should charge per hour per person for paver installations.
Burke’s answer: every company is different. He tells students to start by thinking about how much overhead (full-time staff, facilities, vehicles, owned equipment, etc.) they have to cover.
“If you have a lot of overhead costs, you have to charge more. If you don’t, you can charge less,” Burke explained.
Another factor to consider is the speed at which you can get a paver installation job done.
Burke knows his crew can lay approximately 800 square feet of pavers in a day and he uses this figure to calculate his costs. But each person and each crew is different.
“You have to know your crew and what they can do in a day,” Burke said.
Although Burke shares his “magic number” in class, his message to students is clear: Burke’s magic number is not their magic number. “You have to know your own numbers, your own productivity rate.”
The Square Foot Price Trap
When it comes to selling paver installation services, Burke warns class participants to be careful about answering the question homeowners most commonly ask first: What do you charge per square foot?
“Every job is different,” Burke said. Not only do you need to know your own numbers and your crew’s productivity, but you have to be familiar with the local site conditions before you can give an estimate.
“The cost to install a 200 square foot square patio in a front yard with easy access is different than a 200 square foot circular patio in a backyard that you can only access via small gate,” Burke explained. “You can use a machine to dig one but the other requires hand digging and lots of cuts. Another big variable is the paver chosen by the homeowner; paver costs vary widely.”
If a customer insists on getting a per-square-foot rate up front before you can assess the site, Burke’s advice is simple: give them a large price range so you have flexibility when you are ready to prepare an official quote or estimate.
Expert Tips & Tricks: It’s the Little Things That Make a Difference
During the class, Burke shares shortcuts, techniques, and tips – things he’s picked up in his 20 or so years of experience – that can make a huge impact on productivity, whether you are installing a simple or complex paver design.
Participants really appreciate these tips. A 2013 attendee said the class was a “great general overview plus [I got] lots of handy tricks that I know will greatly improve efficiency on the job. Everything involving pavers was covered and I really feel the streamlining tips will really help.”
In addition to the tricks he picked up during his career, Burke also follows the guidelines of the International Concrete Paving Institute (ICPI) – the industry’s governing body. Burke is certified by ICPE – one of only about 75 people in North America to achieve that credential.
One tip he shares in class – using sand instead of stone dust in the base prep – comes from ICPI’s “rules.” Why?
“Stone dust breaks apart over time and doesn’t drain well,” Burke explained. “Pavers lock together in a tighter bond when you use sand. Sand also drains more quickly and is more forgiving if there are some imperfections in the installation.”
The end result: if there are little variances across the paver patio or walkway, you won’t notice them as much when you use sand.
A Sampling of Attendees’ Favorite Tricks & Tips
- Quick installation of a circle kit pattern
- How to “cut in inlays”
- The “best way to cut edging”
- “Properly installing string lines as guides”
- “Scribing used curved edging”
- Using sand instead of stone dust
And what about dealing with difficult site conditions, like clay soil?
“It’s very spongy,” said Burke. This can create a host of problems, but not to worry, Burke said, “I have a couple of solutions and tricks to deal with that too.”
Landscapers, designers, laborers, and homeowners interested in learning how to lay concrete paver walkways and patios will have the opportunity to hear Burke’s tricks of the trade, business lessons, and all of the wisdom he has to share at the next offering of the Rutgers Concrete Pavers class.

Learn more about our Concrete Pavers course!
Contact Joe Canzano at 848-932-7317 or joe.canzano@rutgers.edu.